Your project plan might be top-notch. Your team might be the best in the business. You might be the greatest project manager ever born, but if you fail to monitor your project’s progress effectively, be prepared for some unwelcome surprises.
With 60% of project managers believing poor risk identification is the largest cause of project delays and failures, chances are something is going very wrong in the fourth stage of the project life cycle: the project monitoring and control phase. It’s where you’re supposed to pick up and control risks.
So we thought we’d do a quick refresher for those of you who might be struggling in this space. In this article, we explain what the project monitoring and control phase in project management is, what techniques you can use to apply it, and we give you a 5-step process to embed it into your project management workflow.
What is project monitoring & control?
Project monitoring and control is the fourth phase of the project lifecycle, where the project manager tracks and manages the progress of all the tasks in the implementation phase.
A key part of this phase involves creating and sharing performance and key performance indicators reports to the project team, sponsors, stakeholders, or clients, as well as the leadership team. This helps keep everyone up to date with the status of the project.
Project monitoring and control is made up of two separate parts, which are interdependent.
Project monitoring
The first is project monitoring. Here, the project manager tracks every task carefully and watches for any issues or misalignment to the originally approved project plan, whether that be in timeline differences, resource allocation misallocations, scope changes, or budget discrepancies.
Project control
The second is project control. Here, the project manager comes up with mitigation or risk management strategies to apply and fix any issues identified in the above project monitoring stage.
Unlike other phases, project monitoring and control run simultaneously with the third phase, project execution. The purpose of the project monitoring and control phase is to keep a close eye on progress so that anything that poses a risk to the project’s successful completion can be picked up and fixed early in the journey to prevent costly failures at the very end.
Types of project monitoring & control techniques
There are a number of project monitoring and control techniques in project management you can use to track your projects. Ideally, you’ll use several simultaneously, and the ones you choose will depend on the size, type, and complexity of your initiative.
Milestone tracking
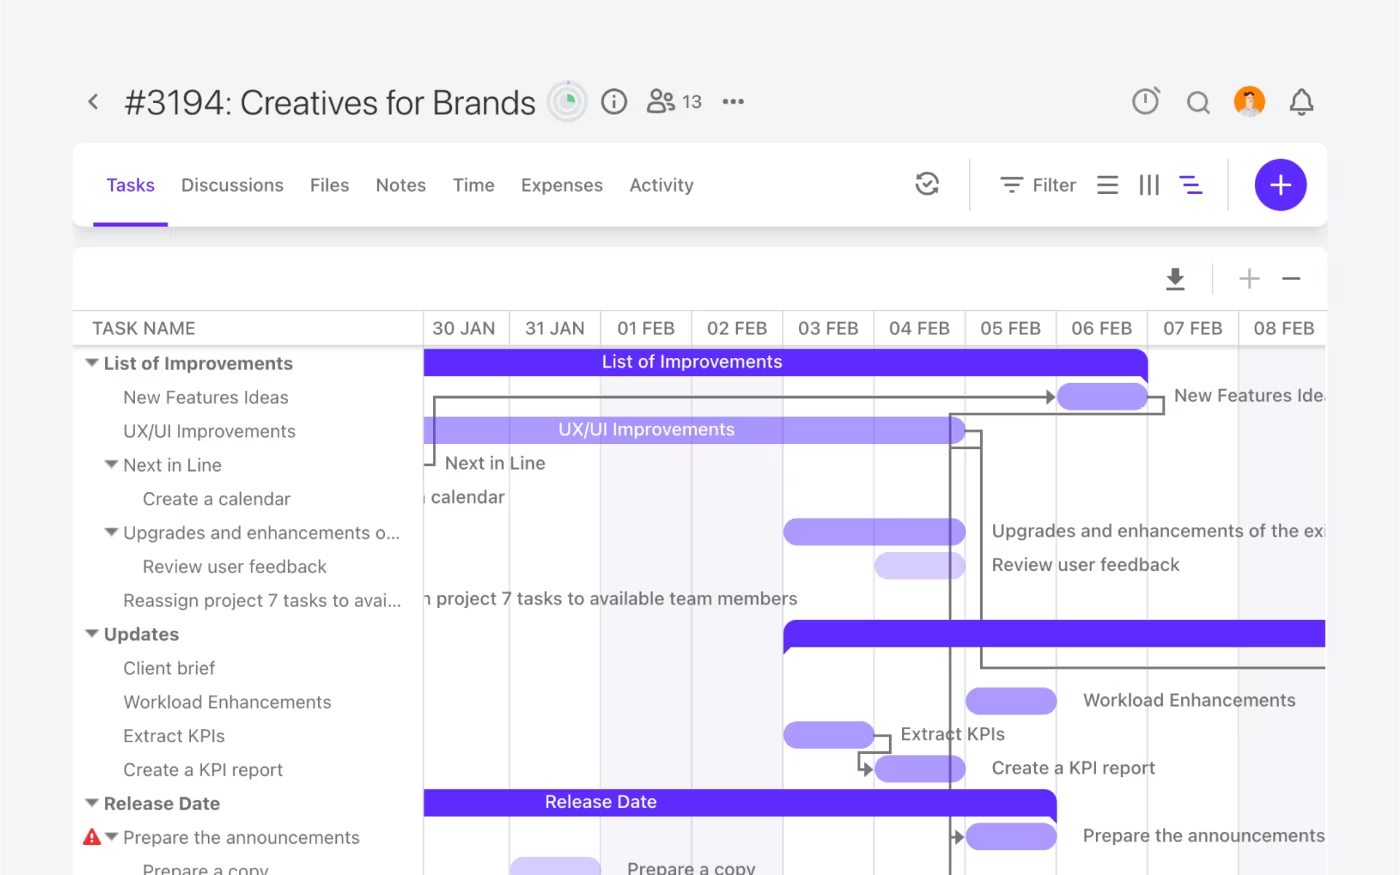
Milestone tracking involves observing the planned achievement of key milestones or events in your project schedule timeline. Since most projects have key deliverables that lead to the final output, this makes it easier to track progress in increments and focus on each as they go along.
Projects that could benefit from this type of monitoring include: website design, marketing campaigns, construction projects, software development, and event planning.
If you want to use the milestone tracking technique, you’ll need to:
- Set milestones – Best done in a timeline view of a project management tool like ActiveCollab.
- Observe progress – Keep an eye on the smaller subtasks that lead to milestone deliverables on a regular basis.
- Compare against plan – Monitor if progress is aligned to your planned project schedule or if it’s being delivered early or with a delay.
- Apply corrections – If subtasks within a milestone are delayed, you’ll need to come up with contingency plans to correct and minimize negative impact on schedule and future milestone deliverables.
Risk management
Risk management (as a project monitoring and control method) involves identifying potential risks, assessing them, and coming up with a plan to tackle them so you minimize negative impacts on the project. However, the term risk management is also used in a general business sense when referring to managing negative consequences. It’s important you don’t confuse risk management and issues management, as they are different processes.
This method is highly recommended for projects with high complexity and uncertainty, those with high potential to cause financial, reputational, or operational impact, and those with strict compliance requirements.
To use the risk management technique, you would need to:
- Compile a risk log – Compile and record potential risks in a document.
- Assess risks – Establish the probability and impact of identified risks.
- Plan responses – Work out your best action plan for each, whether it be avoiding the risk, mitigating it, or accepting it as is.
- Monitor, control & document – Keep a watchful eye on the risks, apply controls if and when necessary, and document changes in a risk register.
Earned Value Analysis (EVA)
Earned Value Analysis is a monitoring method that relies on quantitative project performance measures such as scope, time, and cost. This is a more complex approach and a numbers game, and it’s a technique that’s loved by data buffs and analysts.
It’s not a method you used just for short-term projects, nor is it for agile projects with flexible costs and timelines., However, it’s ideal and recommended for construction and infrastructure projects, IT and system integrations, product development, government projects, and large-scale research and development projects.
The steps involved in the EVA method are complex, but a basic outline includes:
- Using key metrics – These are Planned Value (PV), Earned Value (EV), and Actual Cost (AC).
- Monitoring performance indicators – These are the Cost Performance Index (CPI) and Schedule Performance Index (SPI).
- Analyzing variance – Such as Cost Variance (CV) and Schedule Variance (SV).
- Forecasting – Coming up with an Estimate at Completion (EAC), which predicts future performance.
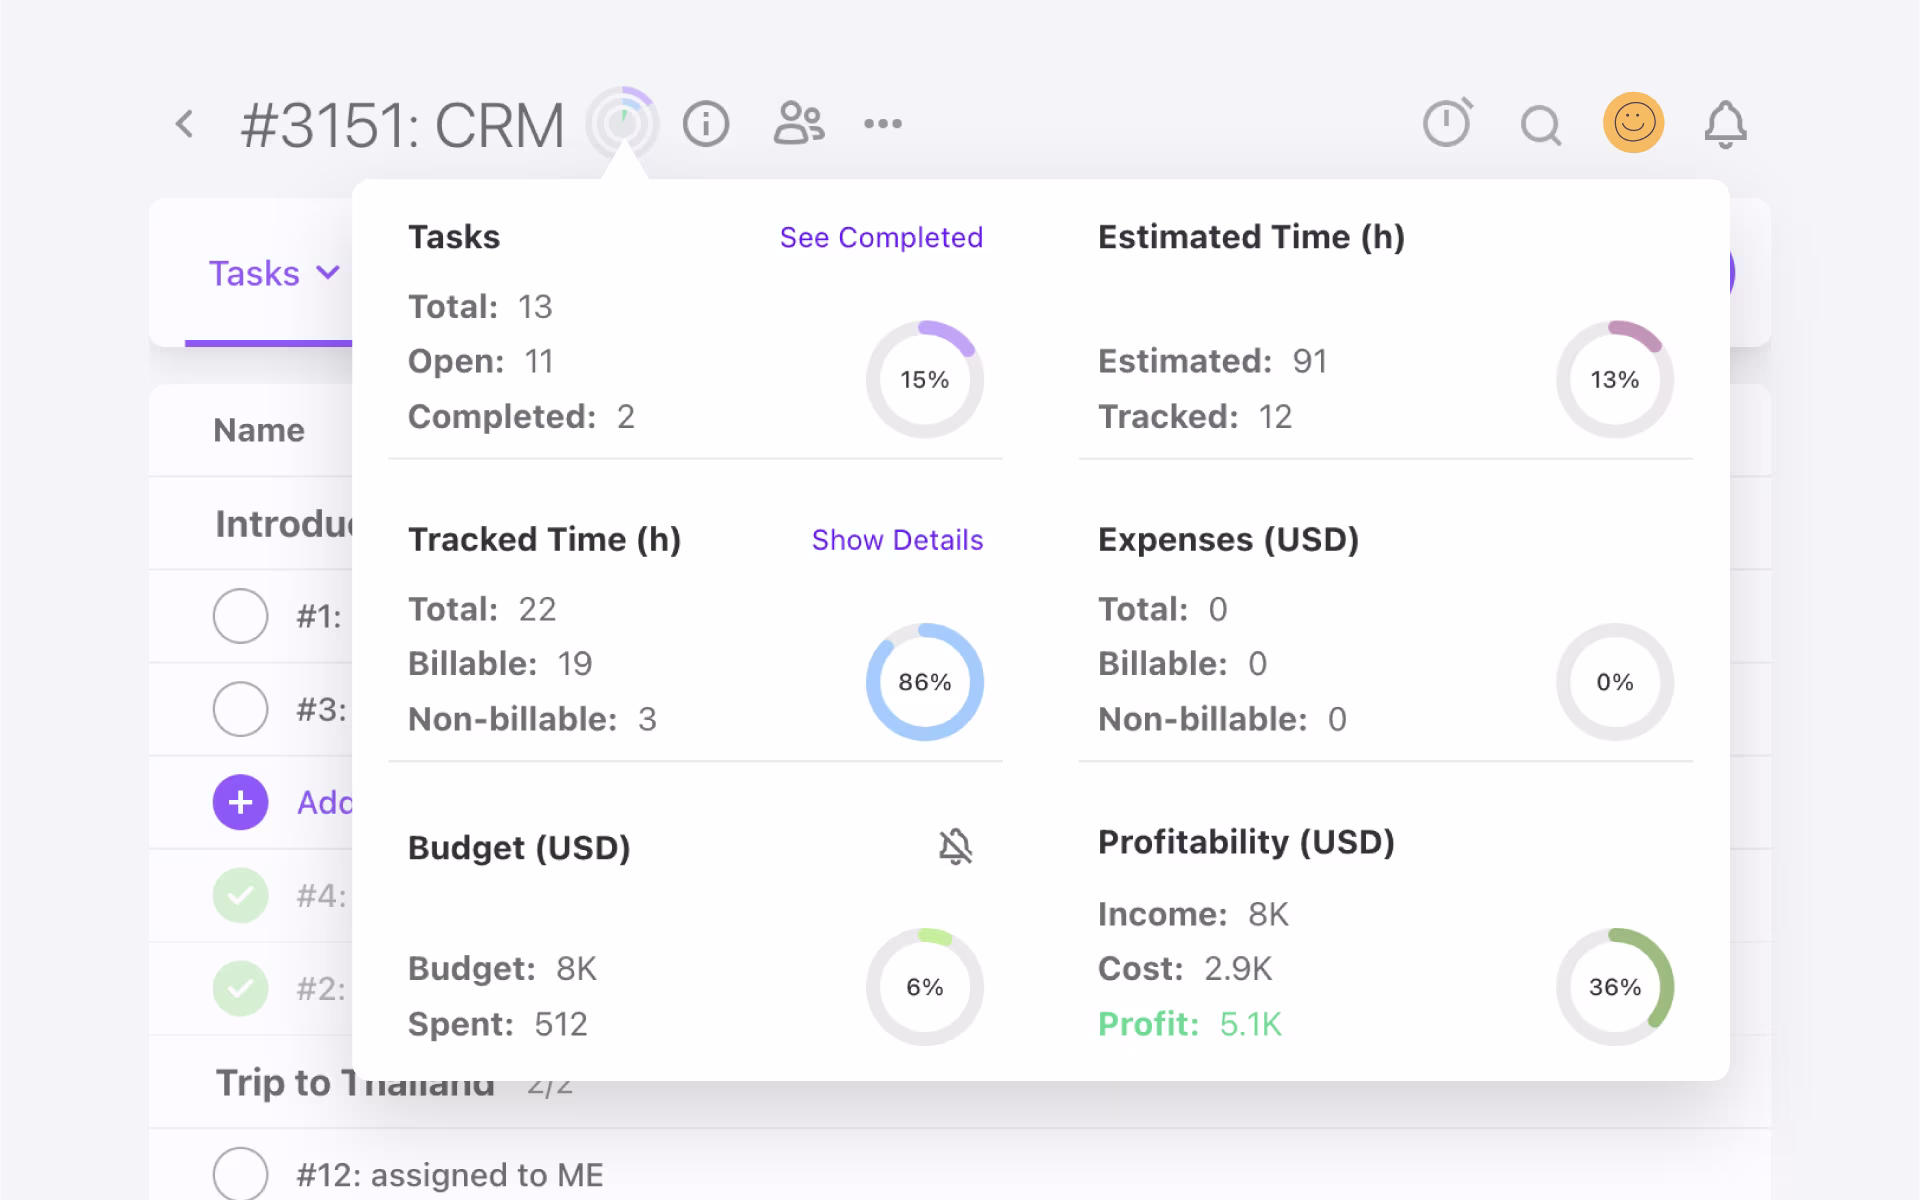
Project management software dashboards
The project management software dashboard method gives you a visual overview of a project's progress in real-time. They generally include several key project success metrics such as budget spend, task completion rates, and expense tracking, but you can also customize and construct your own.
This last method is the simplest, quickest, and easiest to apply because a tool does the work of tracking for you. All you have to do is set up the project accurately within the tool with all the corresponding timelines and budget data.
To use the project management tool dashboard method, you’ll need to:
- Set up the project – Create the project in a project management tool with KPI reporting dashboard capabilities like ActiveCollab.
- Assign project tasks, set metrics & alerts – Set up task assignments, insert task time estimates, enter allocated budget, and budget spend alert notifications.
- View dashboards – Customize your own dashboards with relevant metrics or use a general overview dashboard to monitor progress daily.
- Generate reports – Most tools also give you the option of generating reports for various metrics by project, team members, or task, so you can get a more refined view to analyze progress.
5 steps for project monitoring & control
When you’ve selected the technique/s you’ll use to monitor and control your project, it’s time to put your tracking plan into action. To do that, you’ll need to follow five steps.
Step 1: Establish what elements you will monitor & control
The first step is to establish which elements of the project you will focus on monitoring. These could include:
- Milestones & project work progress
- Budget/Expense status
- Schedule adherence
- Scope alignment
- Potential risks
- Deliverable Quality
- Resource capacity
- Stakeholder communications
Remember, there are no right or wrong choices here. It really depends on the type of project you are running and your priorities. In an ideal world, you’d want to monitor all of the above, but that could turn into an overwhelming mess.
Some projects might have an extremely tight budget, but not a strict timeline. Others might be the opposite. So the best advice here is to custom-choose your monitoring activities by project.
Once you know which elements you’ll be tracking, it’s time to start gathering the progress data.
Step 2: Gather and analyze data
Step two is gathering progress data for each of the elements you selected and comparing it against planned achievements.
If budget was one of the things you wanted to track, you would get the figure for current spend and check it against your planned budget breakdown for the selected time period and activity. If it’s within budget, you’d move on to the next monitoring element. However, if it’s over budget, you’ll need to go to Step 3.
Step 3: Hold progress meetings with the team
Step three is important because this is where everyone gets together to give their progress update. This also presents an opportunity to discuss which tasks and deliverables are not where they need to be, why, and what can be done about it.
Normally, the project manager will lead this meeting, and the focus areas will be identifying any roadblocks in task completion and their causes.
Some other things that should be discussed include:
- Existing issues
- Risk register status and updates
- Potential resource, timeline, and scope changes
After the meeting, it’s a good idea to send out a post-meeting summary that includes an updated project roadmap, so everyone is clear about the project status.
Step 4: Assess risks, evaluate quality of deliverables
Where possible, it’s best to come up with fixes and next steps in the meeting. However, some more complex issues might need to be escalated higher or analyzed and discussed with task owners, stakeholders, or clients after the meeting.
So this next step is about taking those issues and working out how their deviation from the planned progress will impact the overall delivery. You’ll want to evaluate how changes in timelines, costs, resources, or scope will impact the quality of deliverables, and which risks need to be addressed with a corrective plan.
Step 5: Plan and take corrective action
The last step of the project monitoring and control phase is to come up with a repair plan and apply it to those risks and trouble spots.
Remember, the goal here is to get the project back on track and realign it so you reach your end goal successfully.
What your corrective action plan will involve will depend on the risk itself. The most common corrective actions for projects include:
- Reallocating or onboarding new resources to prevent timeline delays
- Fast-tracking the schedule to meet deadlines
- Removing non-essential tasks/features/deliverables from the scope in favour of meeting the project deadline and budget
To help you determine what the corrective action needs to be, you can ask yourself three questions:
- What needs to change?
- Who will be responsible for the change?
- What corrective options do I have at my disposal (money, time, or people)?
- Who or what other tasks will this planned change impact (think dependent tasks), and do I need to take any measures to support that impact?
Once you know this, you’ll need to update the relevant tasks in your project management tools and implement corrective actions . It’s also a good idea to send out a communication letting the entire project team and stakeholders know changes have been made to the project plan or schedule.
Use ActiveCollab to monitor and control projects in real time
Project monitoring and control is the pulse check for your entire project’s health. Do it well, and you can be sure to bask in the feeling of success when the initiative gets wrapped up. Do it poorly, and you and your entire team will struggle to the very end.
Successful project management campaigns require tools like ActiveCollab to simplify project tracking and give you a streamlined process for managing risks and changes that need to be made midway through the project.
Whether it’s the daily dashboard you’ll use as a compass to observe how tasks are coming along, or timelines and workload logs, the tool gives you the data you need to catch problems instantly and fix them quickly, ultimately enhancing stakeholder satisfaction .
Designed for service businesses of all types, ActiveCollab acts as unified solution for project management software as it provides real-time insights, brings your attention to pain points, and helps you manage them effectively. Monitor your milestone progress and quality metrics, generating customized reports for your stakeholders and leadership team so everyone stays in sync and on the path to success.
Need a tool to safeguard your next project’s progress and help you with monitoring? Sign up for ActiveCollab’s 14-day free trial or book a demo with one of our people to walk you through the tool.