
Few projects have all the resources they need all of the time. In fact, limited resources and overallocation are amongst the most common reasons why projects run into trouble.
So when you don't have the luxury of endless resource limits, you turn to the only thing you have left: resource optimization.
According to McKinsey, companies that manage their resources better can expect to see a 15% increase in profits. That's an awfully enticing statistic. One that's bound to make you consider some resource optimization techniques.
What are we talking about? We are talking about resource leveling and resource smoothing. These are two strategies used to get the most out of limited team bandwidth and keep projects on track. In this article we tell you what the two techniques are, explain their similarities and differences, and we guide you through the six steps you need to take to make the most of your available resource base.
Differences & similarities
At a high level, resource leveling and resource smoothing share one goal: maximize your team's productivity without overloading anyone or derailing the projects.
In other words, both techniques help distribute work evenly across your project timeline while respecting different constraints.
Resource leveling adjusts project schedules to match resource availability, potentially extending project timelines.
Resource smoothing on the other hand optimizes resource allocation within existing project timelines without changing end dates.
However they apply under different conditions which include:
| Condition | Resource leveling | Resource smoothing |
|---|---|---|
| Schedule flexibility | Project deadline can change | Project end data is fixed |
| Primary constraint | Used when resources are the main constraint | Used when time is the main constraint |
| Critical path method | Can alter the project's critical path (making it longer) | The critical path stays the same |
| Sequence | Usually used as a first preference | Usually applied as a secondary fine-tuning method |
| Use case | Resolve overallocation or resource conflicts | Distribute work evenly to meet deadline |
Despite their differences both are resource optimization techniques that help prevent burnout and project delays, and make your project plans more realistic, efficient and productive.
What is resource leveling & what does it involve?
Resource leveling involves reshaping your timeline so that no resource is assigned more work than they can handle. When you don't have enough resources to take care of all the tasks you initially planned, resource leveling delays or rearranges tasks until your team becomes available to complete them.
Some practical things resource leveling invites you to do includes:
- Delaying certain tasks
- Extending timelines and task due dates
- Redistributing work
- Adding more resources to handle the load (fast-tracking tasks or crashing the schedule)
When should you use resource leveling?
Resource leveling should be your go-to approach when:
- Your team is overbooked
- Resources are scarce
- A critical resource becomes unavailable
- You have a flexible deadline
These scenarios usually happen mid-project when you realize your initial plan is no longer possible.
What is resource smoothing & what does it involve?
Resource smoothing involves adjusting task timing within the existing timeline. This is usually done by using slack time or float, and possibly reassigning resources so that workloads are balanced out, but without extending project duration.
Some ways you can achieve resource smoothing includes:
- Rearranging tasks to avoid peaks and troughs in resource demand
- Divide larger tasks into smaller subtasks and stagger their start times across available resources
- Use the built-in slack time (if you've already included it in your original project schedule)
When should you use resource smoothing?
You should turn to resource smoothing when:
- The project end date is non-negotiable
- You notice workload distribution is uneven across the project timelines
Resource smoothing helps achieve a more consistent, efficient use of resources where there are no frantic overtime bursts or long idle periods.
How to optimize your project resources in 6 steps
No matter what kind of service business you run, whether it's a small or large agency or a tech startup, you've probably faced a project resource dilemma at some point that's made you rethink your initial plan.
Whether it's team members complaining they simply can't deliver on time or clients asking if there is any chance they can make some last-minute changes that throw your entire plan off course, resource optimization may be the thing that saves the day.
Below is a simple six-step method for optimizing resources that will do the trick for any project-based campaign or client initiative.
Step 1: Determine resource capacity and project demands
The first step is to establish what needs to be done in terms of individual project tasks, their effort estimates, and who is available to take on this work.
Start by:
- Mapping out your team's capacity: Analyze your team's capacity for the project timeline, looking at how many hours (realistic available capacity) each person can contributed each week
- Mapping out the project: Use the Work Breakdown Structure (WBS) you already have for the project or simply break down your project into manageable tasks so you can map out how much time all the work will require from the team.
When you're done, you can compare your project timeline and demands with your resource supply levels.
Once you do this you'll be able to see where there are resource gaps which could be exceeding your team's capacity or vice verser.
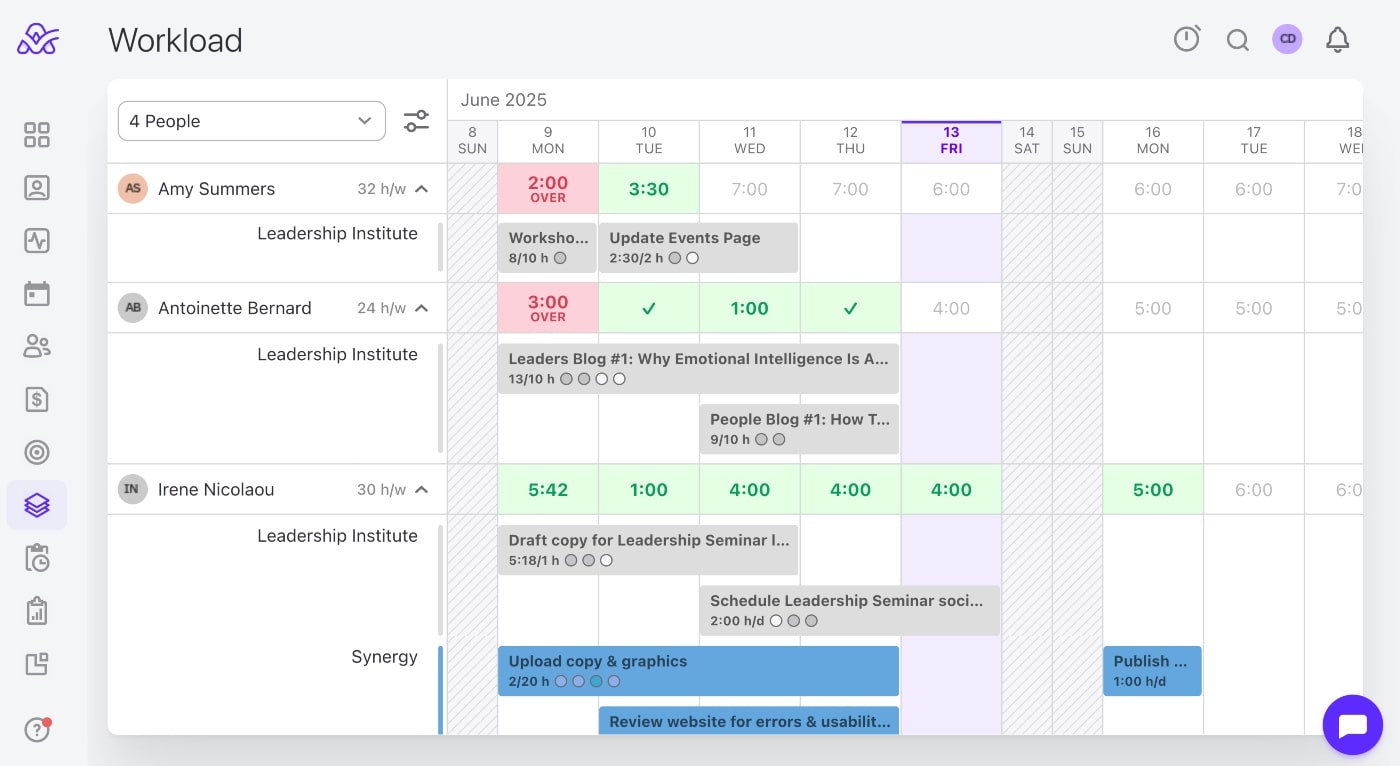
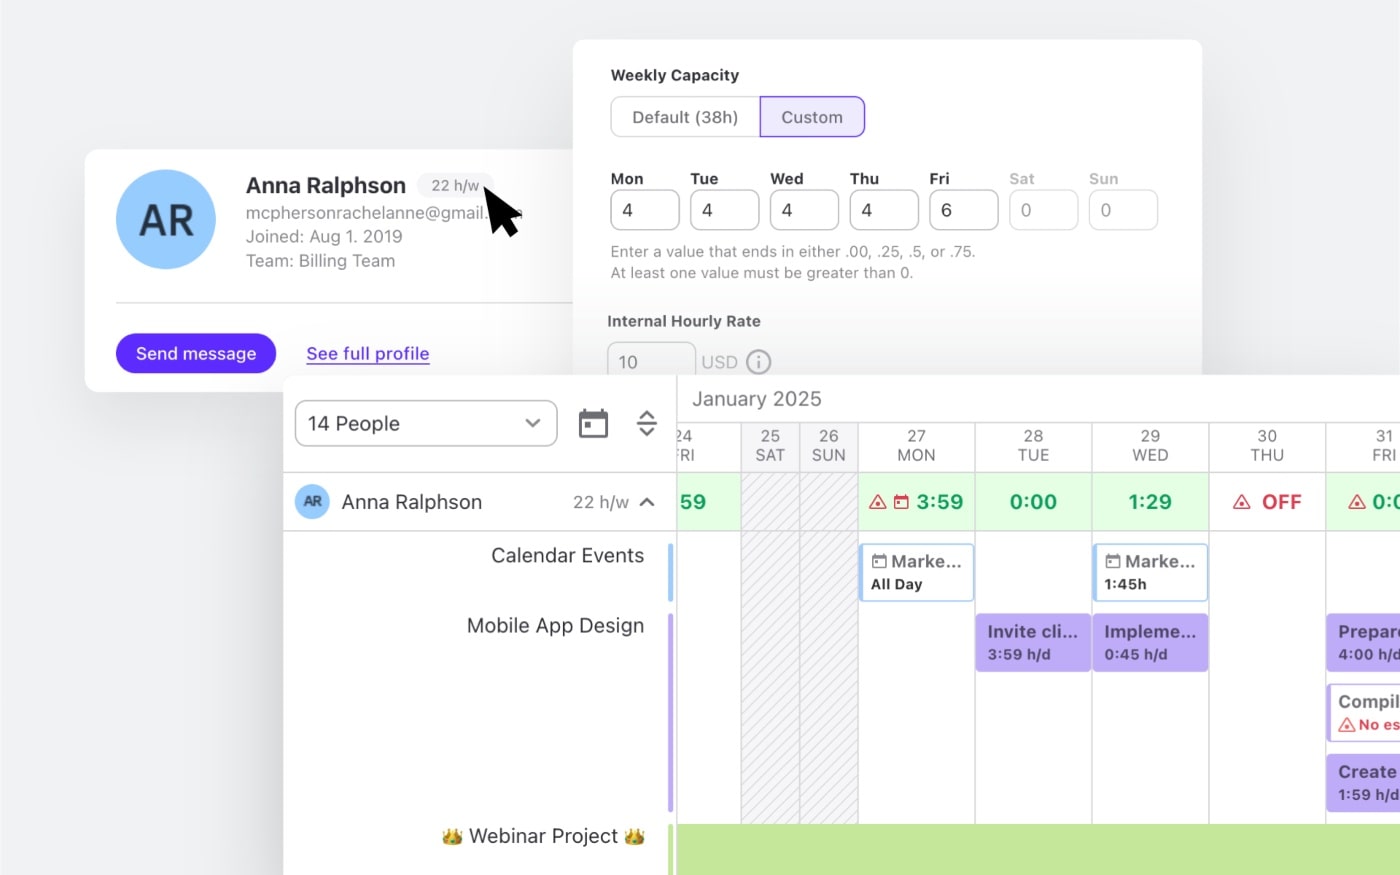
This kind of project capacity planning can be easily done with a tool like ActiveCollab. By setting up a project and then using the Workload feature, you can quickly see which team members' available capacity will meet your project's needs and which will go into overallocation which puts them at risk of burnout.
Step 2: Choose between leveling and smoothing based on constraints
With a detailed overview of everything that needs to be done, the next step is to decide which resource optimization technique is appropriate for your project.
To work out which of the two is the best fit for you situation, consider the following:
- Prioritize based on project constraints: If deadlines are flexible but resources are fixed, resource leveling is likely your best option. If deadlines are fixed and non-negotiable, resource smoothing is more appropriate.
- Assess available slack time: Resource smoothing works well when there’s sufficient slack in non-critical activities. Without this slack, leveling may be necessary despite the timeline impact.
You can also consider the nature of the problem within its full context. An actual shortage of resources whether they be hours or people would suggest that leveling is the best option. On the other hand, timing issues where work is piles up at one or two specific points in the timeline, usually suggests that smoothing is the way to go.
There might even be a need to combine the two techniques and use them one after the other. You might level the schedule first, and then decide to smooth out the tasks.
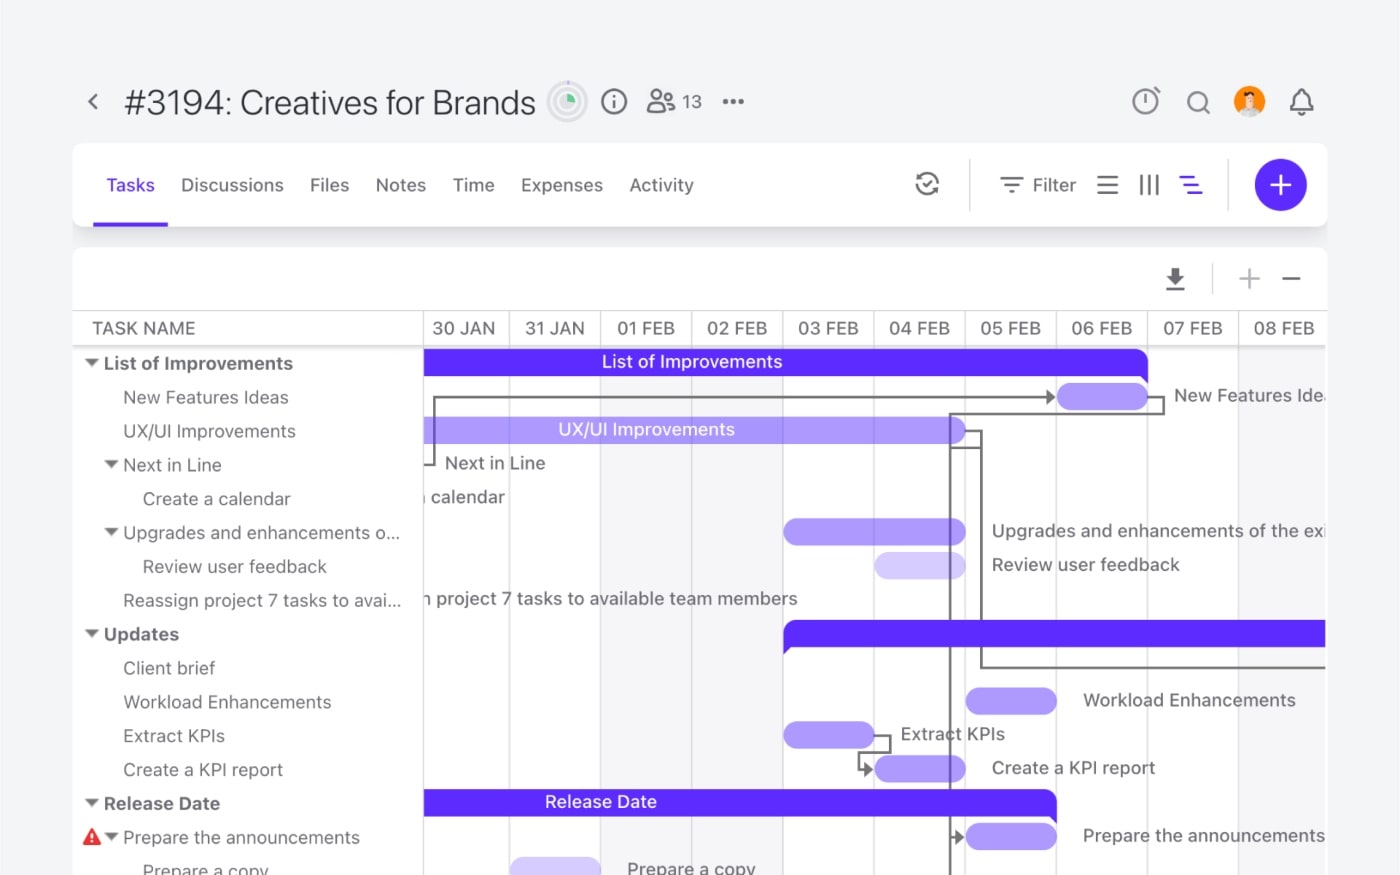
Step 3: Identify the critical path
Step three is to identify the critical path in your project. This is the group of tasks that must be finished on time for the project to be delivered successfully and on time.
By analyzing and identifying your critical path, you'll also reveal which tasks have "slack" or "float" that you can take advantage of.
Depending on the resource optimization technique you've chosen to go with, you'll have two directions to head in from here:
If you've chosen:
- Resource leveling: Since you have the flexibility to adjust the project schedule and accept a later finish date, you might delay critical tasks as well as those with float if resources demand it.
- Resource smoothing: Since critical tasks can't move without delaying the project, you'll only adjust tasks that have float.
Understanding your critical path helps you determine which tasks absolutely cannot be delayed and which other tasks have flexibility for resource smoothing techniques.
Step 4: Apply the chosen resource optimization technique effectively
Now it's time to use your findings to implement the necessary resource adjustments.
For resource leveling:
- Revise the project schedule to eliminate over allocations
- Push some tasks to start later (if it doesn't interfere with task dependencies)
- Extend deadlines where needed
- Reduce overlapping work
Remember, the goal is to make sure no person on your team is booked beyond their capacity.
For resource smoothing:
- Reschedule or reassign tasks to eliminate workload spikes and troughs
- Move non-critical tasks from peak week workloads to lighter weeks
- Shift tasks from overburdened team members to more available ones
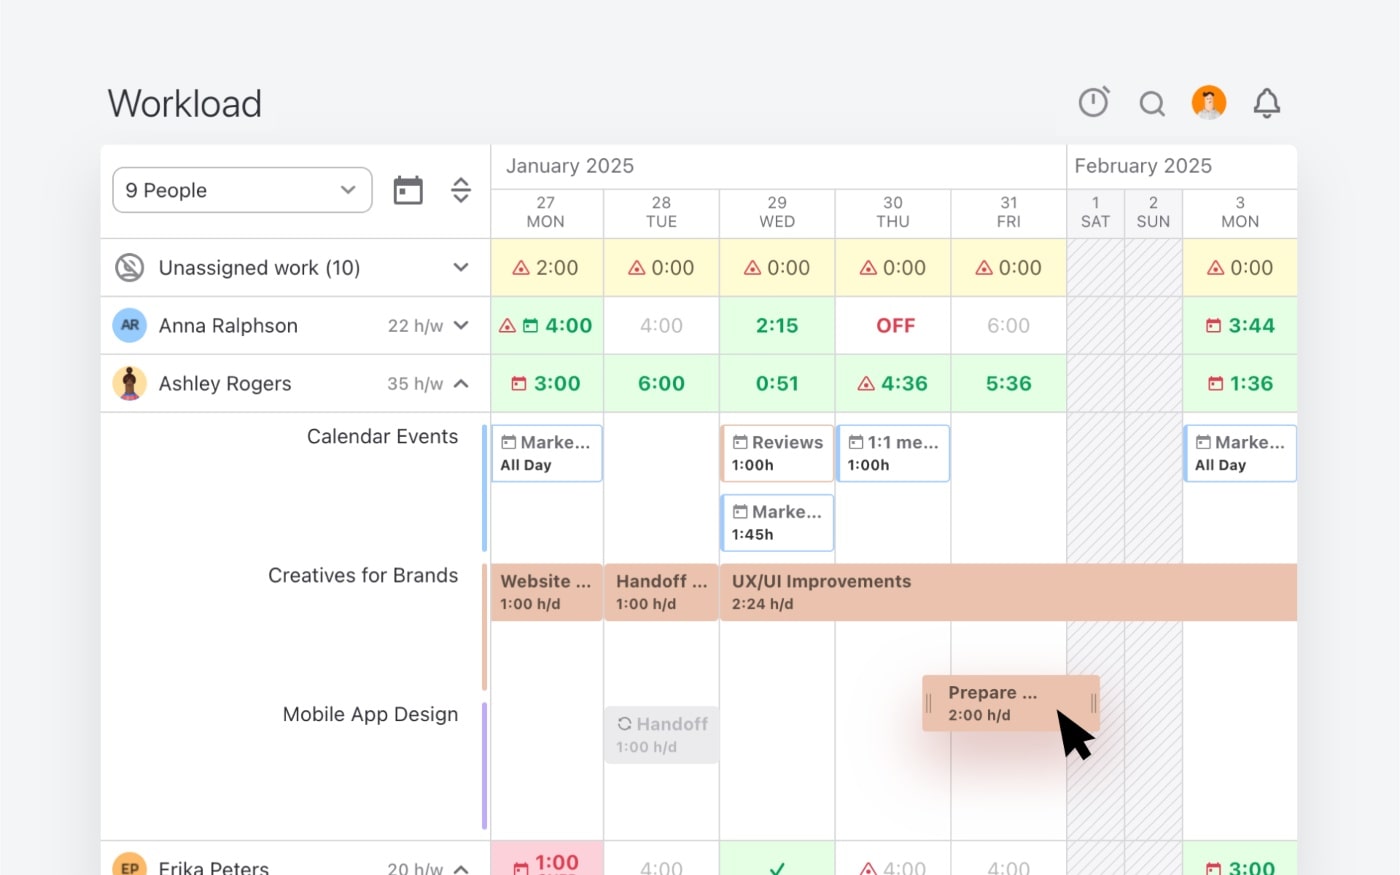
Agency resource and capacity planning tools like ActiveCollab make this step simple with their drag-and-drop task feature which lets you move and reassign tasks amongst team members quickly.
Step 5: Communicate changes to clients and your team
Whenever you adjust a project plan, it's vital you keep all stakeholders in the loop. This includes clients, external collaborators and your teams.
When communicating resource optimization changes and updates provide reasons and explain:
- Why certain tasks are being delayed or rescheduled
- What additional costs might be involved if more resources are needed
- How the chosen approach ensures project success
It also helps to share visual representations of project schedules and workload boards to convey the necessity for change, especially to leadership teams or project sponsors. This is also useful if you are requesting additional budget or resources.
Step 6: Monitor your project & adjust as needed
Projcect resource optimization is a process, not a one-time fix, which means you need to be aware of the circumstances that might require you to keep iterating your project schedules.
Regular project monitoring of your team's workloads and task completion rates will make sure you can optimize and reoptimize resource utilization throughout the project lifecycle, and prevents resource conflicts from derailing your project success.
It's a good idea to use project status and work in progress meetings to communicate any changes such as delays and bottlenecks that can negatively impact your existing schedule or team capacity.
Remember, the key to optimize resource efficiency and utilization is to stay vigilant and alert. Keep an eye out for resource constraints and take a proactive approach by using resource leveling and resource smoothing to catch and fix conflicts early.
Optimize resource allocation with ActiveCollab
Understanding when to apply resource leveling vs. resource smoothing gives you the flexibility to handle different project constraints, including time constraints, effectively. Resource leveling focuses on resolving fundamental resource conflicts even if it extends timelines, while resource smoothing maintains fixed deadlines by working within available slack time.
ActiveCollab can make resource leveling and resource smoothing easier because it lets you manage your projects, clients, teams and workloads all in one place. By centralizing the lot, you can do proper capacity planning and stop resource limitations form creating havoc in your project shedules.
With a visual workload board, you can see each person's assignments and availability. By customizing individual capacities you can factor in the hours of casual freelancers as well as part-time employees. With a simple click, drag and drop, you can balance out resource workloads in seconds.
Real-time schedule adjustments trigger notifications and activity updates so everyone involved in the project task is informed of changes.
As a combined project management and resource management tool, ActiveCollab helps project managers of service businesses prevent project delays and control resource usage so nobody is ever overworked.
Are you tired of using clunky spreadsheet style templates for resource leveling and resource smoothing?
Sign up for ActiveCollab's 14-day free trial or book a demo with our team to see the difference.