Workload Management Software

The fine art of finding a work-life balance has become even more challenging since working remotely became widespread. Whether you're a solo freelancer or in a large team, your own manager, or handing out assignments to large groups, a fair and achievable cargo of tasks should be distributed daily.

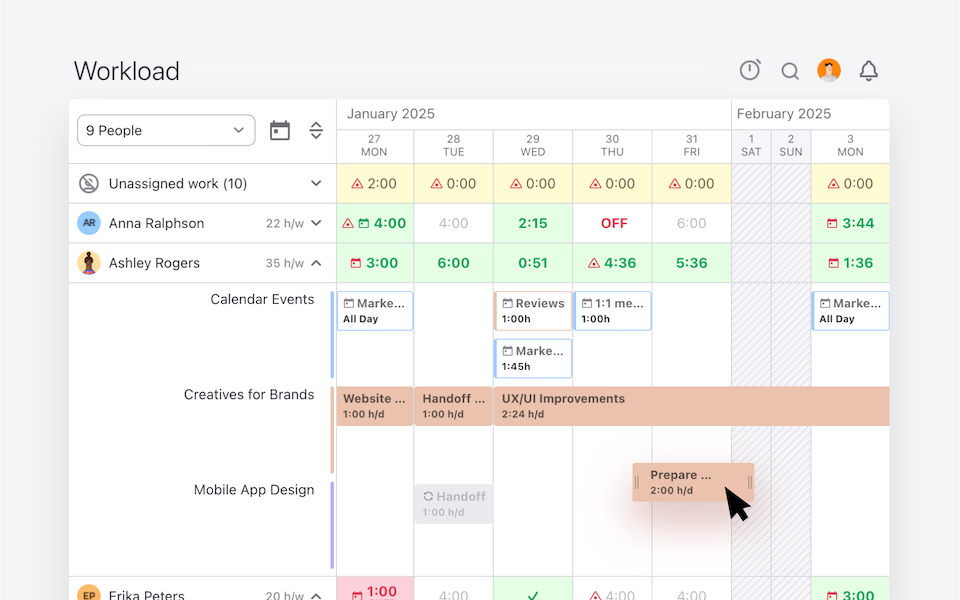
employee workload management in ActiveCollab

What is workload management?

Workload is the amount of work to be done by someone or something, while workload management is distributing and assigning work fairly and evenly to every team member. You don't need to be a project manager to deal with workload management, but they mostly need help with it. Managing assignments for entire teams is a full-time job, and any kind of support is welcome.

This is where software enters the scene. From spreadsheets to project and workload management tools, there are plenty of apps to choose from. Each manager must find the one that suits them most.

Why is workload management important?

Have you ever heard of burnout? It's a nasty disease of the modern age, plaguing almost every company worldwide. Distributing an equal workload to everyone every day is crucial for burnout prevention. A burned-out employee is not a productive or happy employee.

If you're wondering how bad this condition can get and whether your team is already afflicted, these are some of the symptoms: exhaustion, irritability, aggression, isolation, insomnia, frequent illnesses, escapist mentality, chronic fatigue, and depression. None of them contribute to an effective team.

As a manager, you must pay close attention to your team's well-being before it's too late. Once people hit a certain stress level, they would rather leave than try to stay and make it work. And when someone walks out the door, others start questioning if they should do the same. Before you know it, you'll need to replace at least one coworker, onboard new people, and establish new team stability. All this while the project's deadlines approach and clients become increasingly nervous.

Managers are responsible for creating the delicate balance between getting the job done, utilizing each team member's full potential, and not letting anyone burn out. This task is no picnic. Luckily, there are tools designed to make the process easier. Using a platform specifically built for workload management can ease task relocation, improve transparency, and reduce meetings.

The 4-step guide to workload management

1. Decide if and which tool you need

If you're a freelancer or own a small company where the team is very compact, chances are you don't need a tool at all. A whiteboard should do the trick, whether it's a virtual or a real one. Short daily or weekly meetings could also be helpful to know who's working on what. However, when large projects, teams, or companies are in the picture, problems pop up more quickly, and they're harder to solve. It's easy to misinterpret who's accountable, lose track of time and deadlines, misplace files, etc.

Do your homework. Explore, test, ask around, ask for advice. Don't be afraid to try out various tools and play around. Give yourself some time to weigh the pros and cons and make the final decision.

2. Onboard yourself

Again, do your homework. Surely these tools have some form of an instruction manual. They usually come in the form of blog posts or help pages. Read them out thoroughly! Contact their Support Team and schedule a demo. They'll most likely be able to show details you would never have noticed. A product demo or webinar is the best place to ask questions and get to know the tool from top to bottom.

3. Onboard your team

Workload management requires a certain degree of cooperation from the entire team. Once you choose a tool, demonstrate it to everyone and let them know how to use it. Introduce new routines gradually and allow them to adapt slowly.

4. Don't forget the human factor

Be very careful when using technology. Your team members are much more than a sum of tasks and days off. Don't let yourself watch them through the prism of colorful boxes that you move around. Check in on them regularly and individually. They could be performing well while being extremely unsatisfied at the same time.

How do I use Workload in ActiveCollab?

1. Create projects

An unlimited number of projects are at your disposal. Invite your teams and clients and watch as seamless collaboration occurs. Create them, name them, add a description if needed, set up a label and a category. Choose the client company this project is for, or leave the field blank if it's an internal project. When you invite clients to a project, you'll be able to collaborate directly with them and put an end to the endless email chains. It's also possible to tick the "Hidden from clients" box on each task, note, and discussion.

2. Create tasks and assign them

Chop up your projects into actionable items. Make sure you identify the accountable person correctly and assign each task to a team member.

Why is this important for our Workload feature: tasks without an assignee will appear in the Unassigned work row.

3. Set up start and due dates

Completing big projects is like an adventure - creating a roadmap and outlining milestones is just as important. Once you created tasks and assigned them, it's best to define a start (optional) and due date. It will give you a clearer perspective on the project's progress. Also, you'll know when each team will be most under pressure.

Why is this important for our Workload feature: tasks without a due date will not appear in Workload.

4. Set up daily capacities

Daily capacity, otherwise known as employee capacity, can be set up in a couple of places. The default value can be determined and changed in System Settings > Workday Settings.
Note: only Owner roles can access System Settings.

You can also customize each employee's daily capacity. Go to People in the menu on the left, choose a person, and in the three-dot menu, select Change rates and capacity. There you'll be able to pick the default value or enter a custom one. This option is great for those who hire both full-time and part-time employees.
Note: only Owner roles can edit individual daily capacities.

5. Estimate tasks

If you have a well-tuned team on your hands, each assignee will be able to give an accurate estimate of the time needed to complete a task. If not, everyone can give it a try and then perfect their estimates in time.

Why is this important for our Workload feature: tasks without an estimate will appear in Workload but with a warning sign.

To use estimates, you must enable them first. Go to System Settings > Edit Time and Expenses Settings > Time Estimates > On.

You can also turn them on or off on each project. Find the three-dot menu in the upper right corner of a project and choose the Edit option. Enable budget, time, and expense tracking, and you're good to go!

Set an estimated time for each task and select the job type it requires.

6. Explore all the possibilities Workload unlocks

There are various ways to use this feature, and we're sure you'll find the one that suits your team most. Let's take a look at each.

Option 1: Only due dates and assignees defined.
What you'll see: a grid with your team members on the left and their tasks (with a warning sign) placed where their due date is on the calendar.

Option 2: Start&due dates and assignees defined.
Ideal for tasks that require more than one day's work. This option will help you plan out more accurately a week's or month's workload.

Option 3: Estimates, start&due dates, and assignees defined.
Use this option if you'd like to experience the full benefits of Workload. The number of estimated hours will be stretched and divided by the number of days the task is defined to take.

Example: Task 1 is estimated to take 8 hours of work, and its start&due dates say it will last four days. This means Workload will calculate 2 hours of Task 1 for each of those four days.
Now, let's add Task 2 to the equation. It overlaps Task 1, but it takes 3 hours of work and two days. Divided by those two days, it gives us 1.5 hours per day. Combined with Task 1, those two days will sum up to 3.5 hours of work for each day.

7. Enjoy an overview of everyone's workload

Once you set up everyone's tasks, due dates, and estimates, you should be looking at a well-organized plan for the entire team.

Note: Workload shows only assignments from the current week onwards. It doesn't show the past because it's designed to be a planning tool rather than a reporting one.

The most important result of proper Workload utilization is making sure no one burns out while others sit idly. This is where we welcome the color code to the stage.

Remember the daily capacity from step 4? Now we'll blend it with everyday tasks and estimates from step 6. When you look at Workload, you'll see a series of numbers in each box, colored green or red.

Green numbers indicate the number of free hours that person has that day. For instance, if their daily capacity is 8 hours and they have 3 hours of work assigned, the box will display 5:00 in green.

Checkmarks indicate a person is fully booked for the day.
Red numbers tell you how many hours someone will have to work overtime that day, which is never good news.

We highly suggest you take some time and "play around" with start and due dates as well as estimates to get acquainted with Workload's calculations and options!

8. Log your days off

Go to System Settings > Workday Settings > Availability Type and set up as many as you like. We assume the standard ones are Vacation, Day Off, and Sick Day.

Note: only Owner roles can access System Settings.

Depending on the team's agreement, new Availability Records can be added by the manager or the employees themselves.

Go to People in the menu on the left, find the person's profile, and add a new Availability Record. Each team member can do the same through the My Work page > Availability tab, as well.

The selected days or weeks will appear as OFF in Workload.

9. Rearrange tasks if necessary

Unpredicted circumstances happen too often. Some tasks gain higher priority over others, and they need to be moved to a sooner date. Not a problem! Drag and drop them to a different week or even to another person. Stretch out or shrink the start and due dates, and watch Workload do its magic, waltzing around weekends. It will automatically recalculate everyone's daily assignments and show you how much time they're taking out of each team member's day.

10. Allow up to 20% of free time

Here's a friendly reminder that it's ok if you don't see green checkmarks all over your Workload chart. Remember when we talked about burnout? Try not to overload your team. Studies show that those who have some space every day are more productive and creative. Another benefit of not being overbooked is the liberty of stepping in when an urgent task comes up unexpectedly.

Resource management FAQ

Who can view Workload?

Those with Owner or Member+ (with the option to start projects, manage people and use reports) can view and make changes in Workload.

Can I select only three working days per week for some employees?

No, weekends and company-wide non-working days can be set up in the System Settings > Workday Settings for everyone, not individually. However, you can define different daily capacities for each employee.

How can I view Workload in the past?

Workload doesn't display past weeks and months because it's designed to be used as a planning tool. Try out our reports and Timesheet instead!

Why can't I see my recurring tasks in Workload?

The recurring tasks won't appear in Workload up until the moment they're created. Also, they need to have a due date set at least to be displayed in Workload.

Why can't I see my subtasks in Workload?

Subtasks are designed to be used as to-do lists within a certain task, smaller steps needed to complete it. They can't have a due date, the minimum necessary to make them appear in Workload.

How is the estimated time distributed in Workload?

The estimated hours are distributed evenly throughout the number of days a task lasts. Here are a few examples: - Estimated time: 6 hours. Number of days from the start until due date: four. The task is estimated to take 1.5 hours each day - 12 hours and six days will equal to 2 hours each day - 8 hours and no start date means the task will take one entire day to complete (if the daily capacity is set to 8 hours per day).

Why can't I see a task when I set up a due date?

Try looking for it at the very top of Workload, in the "Unassigned work" row!

Is Workload included in the Plus or Pro plan?

Workload is only available with the additional Get Paid bundle. Check out the pricing plans on our website.