Project Templates in ActiveCollab allow you to save time by reusing a predefined structure for similar types of projects. You can pre-set a template and then reuse a project as many times as you like.
How to Create a Project Template?
In ActiveCollab, there are two ways to create a Project Template:
From scratch via the Templates section:
- Step 1: Log in to your ActiveCollab account
- Step 2: In the Projects section, click on Templates
- Step 3: In the top-right corner, click on the New Template icon
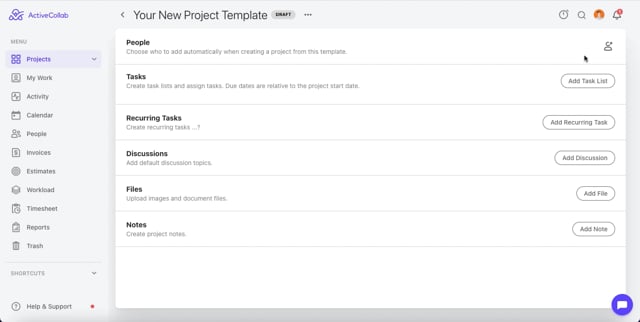
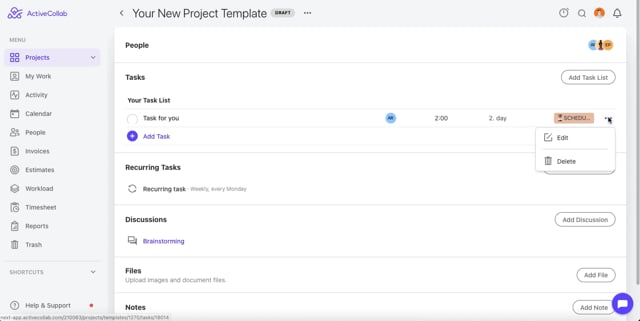
- Step 4: Enter a name for your new template in the top-left corner
- Step 5: In the people section, select users who will be automatically added when creating a project from this template
- Step 6: Create Tasks and Task Lists
- Step 7: Set Discussion topics
- Step 8: Upload Files
- Step 9: Add Notes
- Step 10: All of your settings and changes are being automatically saved.
- Video tutorial: https://vimeo.com/1154580184
Note: Template Due Dates
Template due dates are relative to the project start date. For example, you set the due date for a task to be due 3 days after the project is created. If you created a project from the template on the 1st of January, the task due date would then be the 4th of January.
Note: A Template with the tag "Active" means it has been used atleast once to create a project. A Template with the tag "Draft" has not been used to create a project at the moment.
How to Convert an Existing Project Into a Project Template?
- Step 1: Log in to your ActiveCollab account
- Step 2: In the Projects section, open the project you want to convert
- Step 3: Click on the three-dot menu (...) in the top-right corner of the project’s name
- Step 4: From the dropdown menu, select Convert to Template
- Step 5: In the Convert to Template window, enter a name for your new template or keep an existing name
- Step 6: Click on the Convert button
- Video tutorial: https://vimeo.com/1123579213
ActiveCollab will create a template based on the structure of that project, including task lists, tasks, assignees, due dates, and labels (if any).
Note: This process does not affect the original project. The template is a copy that you can modify separately.
How to Create a Project from a Template?
- Step 1: Log in to your ActiveCollab account
- Step 2: In the Projects page, click on the New Project icon in the top-right corner
- Step 3: Name the project by filling up the Project Name field
- Step 4: Click Show more options underneath the Description box
- Step 5: Click on Choose a template
- Step 6: Choose an existing template from the dropdown menu
- Step 7: Scroll all the way down and click on the Create Project button in the bottom-left corner
- Video tutorial: https://vimeo.com/1123580371
How to Apply a Template to a Project?
A template can be applied to an existing project in order to add the tasks and task lists from a template to any project at any point in time.
- Step 1: Log in to your ActiveCollab account
- Step 2: In the Projects page, open the desired project
- Step 3: Click on the three-dot menu (...) in the top-right corner of the project’s name
- Step 4: From the dropdown menu, select Apply Template
- Step 5: Choose which template to apply from a dropdown menu
- Step 6: Select Tasks Start date
- Step 7: Click on Apply
- Video tutorial: https://vimeo.com/1123582406
Note: the Tasks Start date depends on the date settings on the tasks in the template. For example, if the task in a selected template is set to start on 1 day from project start and the due date is set to 2 days from project start, when applying the template and selecting the task's Start date to be Jun 12, the task’s start and due date will be 12. Jun - 13. Jun.
How to Edit a Project Template?
- Step 1: Log in to your ActiveCollab account
- Step 2: In the Projects section, click on Templates
- Step 3: Click on a template you wish to edit
- Step 4: Make the changes and save them to the template, such as:
- Template name
- People - add new users by checking the box next to their name or remove users by unchecking the box next to their name.
- Task Lists and Tasks
Assignees
Start and Due dates
Labels
- Step 5: Once done, all of your changes are saved automatically.
- Video tutorial: https://vimeo.com/1154583628
How to Delete a Project Template?

- Step 1: Log in to your ActiveCollab account
- Step 2: In the Projects section, click on Templates
- Step 3: Click on the three dot icon next to the template your wish to delete
- Step 4: Click on the Delete button.
- Step 5: Click on Delete option to confirm deletion.
- Video tutorial: https://vimeo.com/1154584377
Note: The template will remain in Trash for 30 days. To remove it permanently, go to Trash and empty it.
How to Delete/Remove a Date from a Task in a Project Template?
- Step 1: Log in to your ActiveCollab account
- Step 2: In the Projects section, click on Templates
- Step 3: Click on the desired Project Template
- Step 4: Click on the Date field.
- Step 5: Click on Delete (Trash Can) icon to delete/remove the date from a task.
- Video tutorial: https://vimeo.com/1173353544
How to Rename a Project Template?
- Step 1: Log in to your ActiveCollab account
- Step 2: In the Projects section, click on Templates
- Step 3 Click on the three dot icon next to the template your wish to rename
- Step 4: Click on the Rename button.
- Step 5: Enter the new name for your template
- Step 6: Click on Rename option to confirm the change.
- Video tutorial: https://vimeo.com/1154585081
How to Duplicate a Project Template?

- Step 1: Log in to your ActiveCollab account
- Step 2: In the Projects section, click on Templates
- Step 3 Click on the three dot icon next to the template your wish to duplicate
- Step 4: Click on the Duplicate button.
- Step 5: Enter the new name for your template
- Step 6: Click on Duplicate option to confirm your action.
- Video tutorial: https://vimeo.com/1154587365