Uploading Files
ActiveCollab lets you keep all your documents and images in one place. Whenever you attach a file to a task, discussion, note, or comment, it’ll also appear under Project’s Files section. You can also upload files directly in the Files section within the project.
Every Project will have its Attachments folder by default. Any file you upload in your tasks, comments, etc. will automatically go to the Projects Attachment folder.
How to Upload Files in a Task?
- Step 1: Log in to your ActiveCollab account
- Step 2: Click on a desired project
- Step 3: Open a Task or create a new one
If you wish to attach a file to an already existing task, click on Edit in the top-right corner next to the task’s name
- Step 4: Find the Attachments area
- Step 5: Click on Attach files or use the drag-and-drop option
- Step 6: From the dropdown menu, you can select to upload a file from:
- Computer
- Dropbox
- Google Drive
- Step 7: Wait for the upload to finish
- Step 8: Click on Save (if you’ve added a file to an existing task) or the Add Task button (if you’ve added a file to a newly created task)
- Video tutorial: https://vimeo.com/1123905606
Opening a file will let you download it. ActiveCollab can also preview images, PDF, and PSD files.
How to Upload Files in Comments?
- Step 1: Log in to your ActiveCollab account
- Step 2: Click on a desired project
- Step 3: Scroll to the comment section in a task, note, or discussion
- Step 4: Type your comment
- Step 5: Click on Attach files or use the drag-and-drop option
- Step 6: Wait for the upload to finish
- Step 7: Click on Add Comment
- Video tutorial: https://vimeo.com/1123903358
If you wish to attach a file after posting a comment, simply click on the three dots (...) next to your comment and then click on Edit.
Note: The Default comment editing period is 30 minutes. The limit on comment editing period can be set by the user with the Owner role in the System settings.
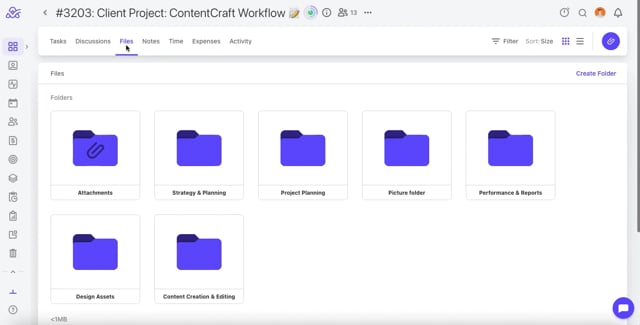
How to Upload Files in the Files Section?
Files uploaded directly in the Files section are not tied to a specific task.
- Step 1: Log in to your ActiveCollab account
- Step 2: Click on a desired project
- Step 3: Click on the Files section within the project
- Step 4: Click on the Paperclip icon in the top-right corner
- Step 5: Upload your file from your Computer, Dropbox, or Google Drive
- Video tutorial: https://vimeo.com/1123917356
Add files quickly by dragging and dropping them to the Files section (same when creating tasks, discussions, notes, or comments).
How to Create a Folder?
With folders, you'll be able to sort and organize your files in a way that you'll never lose any image, video, or document.
- Step 1: Log in to your ActiveCollab account
- Step 2: Click on a desired project
- Step 3: Click on the Files section within the project
- Step 4: Click on Create Folder in the top-right corner underneath the paperclip icon
- Step 5: Name the folder
- Step 6: Click Save
- Video tutorial: https://vimeo.com/1123918046
How to Add Files in a Folder?

- Step 1: Log in to your ActiveCollab account
- Step 2: Click on a desired project
- Step 3: Click on the Files section within the project
- Step 4: Click on a desired folder
- Step 5: Click on the Paperclip icon in the top-right corner
- Step 6: Upload a file from Computer, Dropbox or Google Drive
- Step 7: Wait for the upload to finish
- Video tutorial: https://vimeo.com/1038892892
How to Rename a Folder?
- Step 1: Log in to your ActiveCollab account
- Step 2: Click on a desired project
- Step 3: Click on the Files section within the project
- Step 4: Click on the three dots (...) located in the top-right corner of the folder (when in Grid view) or on the far right side of each folder row (when in List view)
- Step 5: From the dropdown menu, click on Rename
- Step 6: Add a new name
- Step 7: Click Save
- Video tutorial: https://vimeo.com/1123919496
How to Move a Folder?
- Step 1: Log in to your ActiveCollab account
- Step 2: Click on a desired project
- Step 3: Click on the Files section within the project
- Step 4: Click on the three dots (...) located in the top-right corner of the folder (when in Grid view) or on the far right side of each folder row (when in List view)
- Step 5: From the dropdown menu, click on Move to
- Step 6: Select the new place for your folder
- Step 7: Click Move
- Video tutorial: https://vimeo.com/1123928064
How to Filter Files in the Files Section?
- Step 1: Open a desired project
- Step 2: Click on the Files tab within the project
- Step 3: Click on the Filter option in the top-right corner
- Step 4: From the dropdown menu, select how you’d like to filter your files:
- File Type - select one or more by checking the box ( Archive, Document, Image, Spreadsheet, Video )
- Extension - select one or more by checking the box ( cvs, jpg, pdf, png, mp4, other..)
- Uploader - filter the results by checking the box of the person who uploaded the files
- Location - Comment, Project, Task
- Step 5: Click anywhere on the screen to exit the filter section
- Video tutorial: https://vimeo.com/1123928900
How to Sort Files in the Files Section?
- Step 1: Open the Files tab in a project
- Step 2: Click on the Sort option in the top-right corner
- Step 3: Files can be sorted in ascending and descending order by
- Name,
- Date Added,
- Size
- Video tutorial: https://vimeo.com/1123930186
How to Change a View in the Files Section?
- Step 1: Open the Files tab in a project
- Step 2: Choose between the List and Grid view located in the top-right corner
- Video tutorial: https://vimeo.com/1123931562
How to Move a File to a Different Folder?
- Step 1: Log in to your ActiveCollab account
- Step 2: Click on a desired project
- Step 3: Click on the Files section within the project
- Step 4: Click on the three dots (...) located in the top-right corner of the file (when in Grid view) or on the far right side of each file row (when in List view)
- Step 5: From the dropdown menu, click on a desired folder
- Step 6: Click Move
- Video tutorial: https://vimeo.com/1038892845
How to Hide a File from a Client?
- Step 1: Click on the Files section within the project
- Step 2: Click on the three dots (...) located in the top-right corner of the file (when in Grid view) or on the far right side of each file row (when in List view)
- Step 3: From the dropdown menu, check the Hidden From Clients box
- Video tutorial: https://vimeo.com/1123932987
How to Rename a File?
- Step 1: Click on the Files section within the project
- Step 2: Click on the three dots (...) located in the top-right corner of the file (when in Grid view) or on the far right side of each file row (when in List view)
- Step 3: From the dropdown menu, click Rename
- Step 4: Type in a name for your file
- Step 5: Click Save
- Video tutorial: https://vimeo.com/1123933735
How to Delete a File?
- Step 1: Click on the Files section within the project
- Step 2: Click on the three dots (...) located in the top-right corner of the file (when in Grid view) or on the far right side of each file row (when in List view)
- Step 3: From the dropdown menu, click Delete
- Step 4: Click the Delete button to confirm
- Video tutorial: https://vimeo.com/1123938834
Note: The File will remain in the Trash for 30 days. To remove it permanently, go to Trash and empty it.
How to Delete a Folder?
- Step 1: Click on the Files section within the project
- Step 2: Click on the three dots (...) located in the top-right corner of the folder (when in Grid view) or on the far right side of each folder row (when in List view)
- Step 3: From the dropdown menu, click Delete
- Step 4: Click the Delete button to confirm
- Video tutorial: https://vimeo.com/1123941504
Note: This will move the folder and its content to Trash. Files attached to tasks, discussions, and notes will be sent to the Attachments folder.