Managing Users in ActiveCollab
Managing users in ActiveCollab allows you to control who can access what, ensuring secure and efficient collaboration. This guide covers everything from inviting users to adjusting permissions.
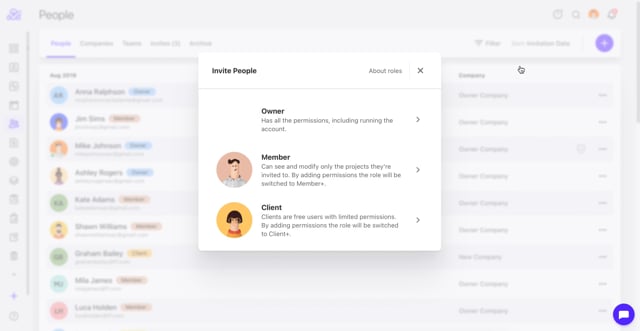
How to Understand User Roles in ActiveCollab?
ActiveCollab offers several user types depending on the level of access required:
- Owner: Has full access to everything in the system, including billing and account settings. There can be multiple Owners in an ActiveCollab workspace.
- Member: Internal team member with full access to assigned projects and core features.
- Member+: Same as Member, but with the ability to manage other users (invite/edit/deactivate).
- Client: External user with limited access—only to specific projects they’re invited to.
- Client+: Like a Client, but with permission to create tasks, invite users to the same project, and access more features within allowed projects.
Choose the role based on the user’s function and required access.
How to Invite a New User to ActiveCollab?
To invite a new user to your ActiveCollab account:
- Step 1: Log in to your ActiveCollab account.
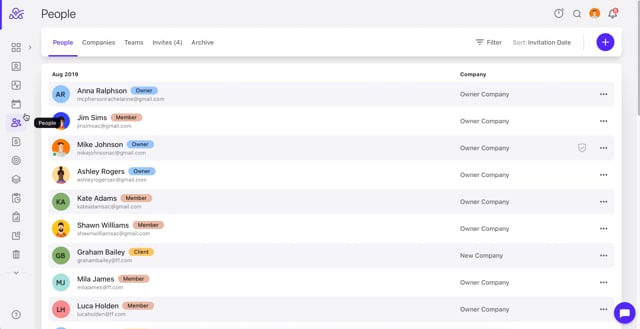
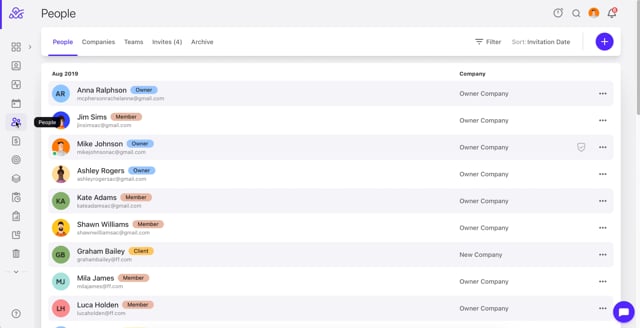
- Step 2: Click on the People page in the left-side menu.
- Step 3: Click on the ‘’+’’ icon in the top-right corner of the page.
- Step 4: From the dropdown menu, click on Invite People.
- Step 5: Choose the appropriate user type: Owner, Member, Member+, Client, or Client+.
- Step 6: Fill out Basic Details:
- Email Address
- First and Last Name (Optional)
- Company - from the dropdown menu, select the company you wish to add your client to (Optional)
- Title - add a title for the user with the Owner role (Optional)
- Invite to Projects - choose the projects you wish to add the Owner to (Optional)
- Step 7: Click Proceed
- Step 8: In the Additional Details section:
- Select the Invitation Language from the drop-down menu
- Write a Welcome message (optional)
- Step 9: Click Invite
- Video tutorial: https://vimeo.com/1124906032
Tip: Fields marked with a * are mandatory. The invited user will receive an email with instructions to join the account.
How to Edit a User in ActiveCollab?
- Step 1: Navigate to the People section.
- Step 2: Find the user you want to modify.
- Step 3: Click the "..." next to their name and select Edit.
- Step 4: Update:
- Change their permissions
- Rates and Capacity
- See the history of changes
- Invite to Projects
- Archive
- Delete
- Video Tutorial: https://vimeo.com/1124907303
How to Delete or Archive a User in ActiveCollab?
To Archive a User:
- Step 1: Open the People section.
- Step 2: Click the "..." next to the user’s name.
- Step 3: Choose Archive.
- Video Tutorial: https://vimeo.com/1124911432
Deactivated users cannot log in, but their history (comments, tasks, time records) stays in the system. And if they decide to return to the company, they can be reinstated at any time.
To Permanently Delete a User:
- Step 1: Go to People.
- Step 2: Click the "..." next to the user’s name.
- Step 3: Click Delete.
- Video Tutorial: https://vimeo.com/1124911736
How to Create a Company in ActiveCollab?
Follow these steps to add a new company to your workspace:
- Step 1: Go to the People section in the main menu.
- Step 2: Click on the Company tab.
- Step 3: Click the + New Company button in the top right corner.
- Step 4: Enter the Company Name.
- (Optional) Fill in additional details:
- Company Details – such as address, website, and phone number.
- Tax Number - The Tax Number is applied to invoices, recurring invoices and estimates created for this company.
- Default Currency – The currency is applied to time records, tracked expenses, and invoices for this company.
- Default Tax Rate – Tax rate is set by default in the new invoices and estimates. It can be changed in each document. Default tax rate is set in invoicing section in System Settings.
- Default Invoice Due and Recipients.
- Custom Hourly Rates – define company-specific rates for time tracking and budgeting. Custom hourly rates are usually used for client budget accommodations. You can apply these changes to upcoming projects or to all existing projects.
- Note – add any internal notes or extra information about the company.
- Step 5: When you're done, click Create Company to save.
- Video Tutorial: https://vimeo.com/1124912135
The company will now appear in your People list and can be linked to users and projects.
To view or manage the company's full profile, go to the Client Company page for more detailed information and settings.
How to Create a Team in ActiveCollab?
If the same group of people frequently collaborates, you can save time by organizing them into a team. Here's how:
- Step 1: Navigate to the People section from the main menu.
- Step 2: Click on the Teams tab.
- Step 3: Select + New Team.
- Step 4: Enter the Team Name.
- Step 5: Choose the Members you want to include in the team.
- Step 6: Click Create Team to save.
- Video Tutorial: https://vimeo.com/1124912720
Your team is now ready! You can quickly assign it to new projects instead of adding each user individually.