Client+ Role in ActiveCollab
In ActiveCollab, the Client+ role is ideal for those Clients you wish to have a more detailed and advanced collaboration.
What can the user with the Client+ role do in ActiveCollab?
A Client + role is able to:
- Create, open, and complete tasks,
- Create and arrange their task lists,
- Be assigned and/or assign others to tasks,
- Create and manage recurring tasks,
- View who's on the project,
- Access logs on a specific task,
- See Time and Expenses (if the option "Allow Clients to see time and expenses" is enabled),
- See budget details in Project info.
How To Enable Client+ Role in ActiveCollab?
- Step 1: Click on your profile icon
- Step 2: Select the System settings option from the menu
- Step 3: Navigate to Project section
- Step 4: Toggle Client+ role switch to ON
- Video Tutorial: https://vimeo.com/1150681599
How to Invite a User with the Client+ role in ActiveCollab?
To invite a new user to your ActiveCollab account:
- Step 1: Click on the People tab
- Step 2: Click on the “+” symbol in the upper right corner to Invite people/users
- Step 3: Click on “Invite People”
- Step 4: Select the checkbox under “Additional Permissions. Can create tasks and be assignee”
- Step 5: Fill out the user's basic details and info. These are: Email Address, First Name, Last Name, Company, Title.
- Optional 5.1 step: You can also invite them to projects at this step.
- Step 6: Click on Proceed once you are done
- Step 7: You can now fill their Rates and Capacity. You can select the Default or Custom.
- Step 7.1. Custom Daily capacity allows you to fill users daily availability for each day in the week.
- Step 8: Select the Available Job Types that this user will be able to use once they log their time.
- Step 9: Fill in their Internal Hourly Rate.
- Step 10: Click on Proceed.
- Step 11: You can now fill Additional Details. These are the Invitation Language and the Welcome Message.
- Step 12: Click on “Invite” and you’ve invited the user to your account. Invited users will get an email with the login link to your ActiveCollab account.
- Video tutorial: https://vimeo.com/1125135568
Tip: Fields marked with a * are mandatory. The invited user will receive an email with instructions to join the account.
How to Know the Price When Adding Users with the Client+ role?
ActiveCollab charges based on the number of seats (i.e., users who can log in, excluding clients). Here's how to check the price when adding users:
Visit the Billing section from the top-right menu under your avatar (as the Owner).
There you’ll find your current plan, and the number of active seats.
As the Client+ role counts as a billable seat, you can find detailed information about pricing based on your current plan by visiting our pricing page: https://activecollab.com/pricing.
How do I Archive a Client+ role?
- Step 1: Click on the People tab.
- Step 2: Click on the “...” menu next to the desired Client+ role which you wish to Archive.
- Step 3: Click on the “Archive” from the drop down menu.
- Step 4: Click on Move to confirm.
- Step 5: You have moved the desired Client role to the Archive tab. This user will no longer be able to log into their ActiveCollab account. You will not be billed for them as long as they are in the Archive tab.
- Step 5.1: You can un-archive the user while they are in the Archive tab by clicking on the “...” menu next to them.
- Step 5.2: Click on “Restore from Archive”
- Step 5.3: Click on “Restore” to confirm your selection. This user will now become active, they will be able to log into their ActiveCollab account and you will be billed for them.
- Video tutorial: https://vimeo.com/1125136207
How do I delete a Client+ role?
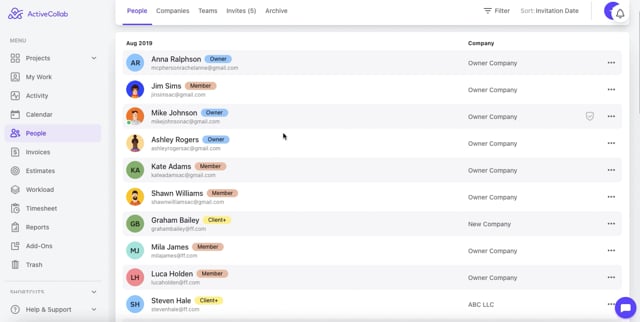
- Step 1: Click on the People tab.
- Step 2: Click on the “...” menu next to the desired Client+ role which you wish to Delete.
- Step 3: Select “Delete” from the drop down menu.
- Step 4: Click on “Delete” to confirm. You have now deleted the user and they will no longer be able to log into your account.
- Video tutorial: https://vimeo.com/1125136737
How do I change the Client+ role to a different one?
- Step 1: Click on the People tab.
- Step 2: Click on the “...” menu next to the desired Client+ role which you wish to change.
- Step 3: Click on “Change Permissions" from the drop down menu.
- Step 4: Select the new role you wish to assign to them.
- Step 5: Click on “Save”
- Video tutorial: https://vimeo.com/1125137202