How to change the View on the Calendar?
- Step 1: Click on the Calendar tab.
- Step 2: Click on the Daily, Weekly or Monthly view in the upper right corner
- Step 3: This will take you to the desired period.
- Video tutorial: https://vimeo.com/1126862924
How to Filter the Calendar?

- Step 1: Click on the Calendar tab.
- Step 2: Click on the Filter icon in the upper right corner.
- Step 3: You can now filter by Calendar, Event Visibility, Member and Project.
- Step 4: Select the desired Filter or Filters.
- Step 5 (optional): To remove active filters click on the “x” icon next to the Filter icon.
- Video tutorial: https://vimeo.com/1126863702
How to Create a Calendar?
- Step 1: Click on the Calendar tab.
- Step 2: Click on the Calendar icon in the upper right corner of the Calendar tab.
- Step 3: Click on the “+” icon from the drop down menu
- Step 4: You can now enter Calendar Name, choose the desired color, select the participants, select whether to Include event duration to participant workload or not by clicking on the checkbox and Apply workload visibility to existing events from this calendar.
- Step 5: After you are done, click on “Create” to create your new Calendar.
How to Create a Calendar Event?
- Step 1: Click on the Calendar tab.
- Step 2: Click on the big “+” icon in the upper right corner.
- Step 3: You can now select the date (or the duration between dates) and should the event be repeated and at what frequency.
- Step 4: You can then enter the Event name, Description, Attach any files and choose the subscribers.
- Step 5: On the right side you can select the desired calendar where you wish to place the event from the drop-down menu, select the participants, Add to participants' workload and add any external meeting URL (Like a link for Zoom, Teams, etc)
- Step 6: After you are done, click on the “Add Event” to create your event.
- Step 6.1 Optional. You can delete an event by clicking on the “...” menu next to the name of the event and selecting “Delete” and confirming.
- Step 6.2 Optional. You can edit the event by clicking on the “...” menu next to the name of the event and selecting “Edit”.
- Video tutorial: https://vimeo.com/1126865075
How to export a Calendar?
- Step 1: Click on the Calendar tab.
- Step 2: Click on the Calendar icon in the Calendar tab.
- Step 3: Click on the “...” menu next to the desired Calendar.
- Step 4: Click on Export events
- Step 5: Choose if you wish to have a subscription link which you can paste into your external calendar or to download an ICS File. You can export to Google Calendar, OS X Calendar, Outlook, or any application that supports iCalendar feeds. You’ll see the calendar, it will update automatically, but you’ll still only be able to Add or Edit events from ActiveCollab.
- Video tutorial: https://vimeo.com/1063529495
How to Import my Outlook Calendar?
If you wish to import your Outlook Calendar into your ActiveCollab account, you'll need to do the following.
- Step 1: Open your Outlook Calendar
- Step 2: Click on "Settings" - "Calendar" - "Shared Calendar"
- Step 3: Under "Publish Calendar" select the Calendar you wish to import and then select the desired permissions.
- Step 4: Click on "Publish" and copy the ICS link
- Step 5: Go to your ActiveCollab account
- Step 6: Click on your Calendar tab
- Step 7: Click on your Calendar icon in your Calendar tab.
- Step 8: Click on the “Import Calendar” icon in the upper right corner
- Step 9: Paste your ICS link in the field
- Step 10: Click on Import and confirm your Calendar preferences by clicking "Create"
- Video tutorial: https://vimeo.com/1072083917
How to Import my iCloud Events?
If you wish to import your iCloud events into your ActiveCollab account, you'll need to do the following.
- Step 1. Open your iCloud Calendar
- Step 2. Click on the desired Calendar on your left side
- Step 3. Make the Calendar public, copy the link and save the changes.
- Step 4: Go to your ActiveCollab account
- Step 5: Click on your Calendar tab
- Step 6: Click on your Calendar icon in your Calendar tab.
- Step 7: Click on the “Import Calendar” icon in the upper right corner
- Step 8: Click on the "Add External Calendar" link and paste your link in the field
- Step 9: Click on Import and confirm your Calendar preferences by clicking "Create"
- Video tutorial: https://vimeo.com/1071795573
How to Import my Google Calendar?
If you wish to import your Google Calendar into your ActiveCollab account, you'll need to do the following.
- Step 1: Open your Google Calendar
- Step 2: Click on "..." menu next to the desired calendar and select "Setting and Sharing"
- Step 3: Scroll to the bottom of the page and copy the "Secret address for iCal format"
- Step 4: Go to your ActiveCollab account
- Step 5: Click on your Calendar tab
- Step 6: Click on your Calendar icon in your Calendar tab.
- Step 7: Click on the “Import Calendar” icon in the upper right corner
- Step 8: Click on the "Add External Calendar" link and paste your link in the field
- Step 9: Click on Import and confirm your Calendar preferences by clicking "Create"
- Video tutorial: https://vimeo.com/1071777879
How to Create a Recurring Calendar Event?
- Step 1: Click on the Calendar tab.
- Step 2: Click on the big “+” icon in the upper right corner.
- Step 3: In the “Repeats” field you can select periods from the drop down menu. You can select Never, Daily, Weekly, Biweekly, Monthly, Yearly.
- Step 4: You can now select the date (or the duration between dates)
- Step 5: You can then enter the Event name, Description, Attach any files and choose the subscribers.
- Step 6: On the right side you can select the desired calendar where you wish to place the event from the drop-down menu, select the participants, Add to participants' workload and add any external meeting URL (Like a link for Zoom, Teams, etc)
- Step 7: After you are done, click on the “Add Event” to create your event.
- Step 7.1 Optional. You can delete an event by clicking on the “...” menu next to the name of the event and selecting “Delete” and confirming.
- Step 7.2 Optional. You can edit the event by clicking on the “...” menu next to the name of the event and selecting “Edit”.
- Video tutorial: https://vimeo.com/1072493495
What Can I See on the Daily Calendar View?
- Step 1: Click on the Calendar tab.
- Step 2: Click on the Daily view in the upper right corner
- Step 3: This will take you to the desired Daily period.
In the daily calendar view you can see all the tasks that will occur on that day, all recurring tasks, events, recurring events and all the people who will not be available on that day.
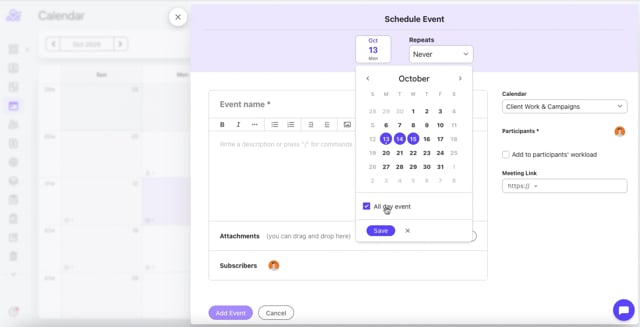
How to Create a Whole Day Event?
- Step 1: Click on the Calendar tab.
- Step 2: Click on the big “+” icon in the upper right corner.
- Step 3: You can now select the date, set should the event be repeated and at what frequency.
- Step 4: You can click on the date in the upper left corner and you’ll see the option for “All day event” in a checkbox.
- Step 5: Click on the checkbox to confirm that you wish to create an event that will last for that entire day.
- Step 6: You can then enter the Event name, Description, Attach any files and choose the subscribers.
- Step 7: On the right side you can select the desired calendar where you wish to place the event from the drop-down menu, select the participants, Add to participants' workload and add any external meeting URL (Like a link for Zoom, Teams, etc)
- Step 8: After you are done, click on the “Add Event” to create your event.
- Step 8.1 Optional. You can delete an event by clicking on the “...” menu next to the name of the event and selecting “Delete” and confirming.
- Step 8.2 Optional. You can edit the event by clicking on the “...” menu next to the name of the event and selecting “Edit”.
- Video tutorial: https://vimeo.com/1063509184
How to manually Refresh an Imported Calendar?
- Step 1: Click on the Calendar tab.
- Step 2: Click on the Calendar Icon.
- Step 3: Click on the "..." menu next to the desired calendar you wish to refresh.
- Step 4: Click on "Refresh"
- Video tutorial: https://vimeo.com/1074209912
How To Show Week Numbers On Calendar?
- Step 1: Log In to Your ActiveCollab Account If you’re not already logged in, follow the login steps to access your account.
- Step 2: Go to Your Profile After logging in, click on your profile picture or name in the top right corner of the screen.
- Step 3: Select “Personal Settings” From the dropdown menu, choose Personal Settings. This will take you to the page where you can adjust your personal preferences.
- Step 4: You can toggle Show Week Numbers on Calendar by clicking on the on/off option to the right.
- Step 5: The change will be automatically applied and saved
Video tutorial: https://vimeo.com/1126868333
How can I Set a Reminder for a Calendar Event?
- Step 1: Click on the Calendar tab.
- Step 2: Click on a desired Event from your Calendar.
- Step 3: Click on the + icon next to Reminders
- Step 4: Select who you wish to notify about this Calendar Event. You can choose between:
- Me
- Participants
- Subscribers
- Custom
- Step 5: Choose one of the following quick options:
- Later Today – reminder will be sent later the same day
- Tomorrow – reminder will be sent the next day at 7:00 AM
- Next Week – reminder will be sent next week Monday at 7:00 AM
- If you choose Custom, a pop-up window will open with the following options:
- Date – select the date when the reminder should be sent
- Time – select the exact time when the reminder should be sent
- Who will be notified – by default, it’s all users subscribed, but you can add or remove people by clicking on the user icon
- Comment – optional text that will be shown with the reminder
How to add a Participant to a Calendar?

- Step 1: Click on the Calendar tab.
- Step 2: Click on the Calendar icon in the upper right corner.
- Step 3: Click on the "..." menu next to the desired Calendar where you wish to add a new participant.
- Step 4: Click on "Edit"
- Step 5: Click on the "Participants" field
- Step 6: Select the desired participant/s from the drop down menu.
- Step 7: Click on "Save".
- Step 8: You can now select/add this/these new user/s from the drop down menu in any Calendar Event.
- Video tutorial: https://vimeo.com/1176889428